Problem
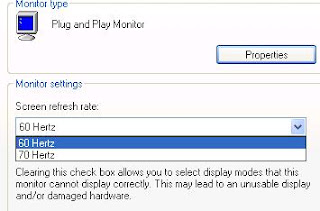
My experience with the old CRT monitor when using Windows Vista or Windows 7, and Windows XP with the drivers and nVidia VGA cards, although you can only select the monitor mode and exposed by removing the check "Hide modes that this monitor can not display". but still not able to display correctly. What if your monitor supports higher resolution but still did not display the image, it means you are stuck in the limitations of 60 Hertz refresh rate, You will get blank display after windows starting even system running normally.
Why this happens?
Windows 9x uses the EDID to detect a Plug-and-Play monitor's maximum resolution, but this can be overridden by disabling PnP detection monitors and manually selecting a (modified) drivers for the monitor. Windows XP honors the EDID for PnP monitors as well, but this behavior can be overriden via the "Hide modes that this monitor can not display" option. Windows Vista honors the EDID no matter what, so the only way to disable it is to do so at the hardware level.
Solution
You must be doing a little hack to your DSub connector:
1. The Tools, make sure you have the following:
* Needle-nose pliers
* Pinout of a VGA connector, available here (optional)
* Monitor cable (VGA)
* A few minutes of time (but may take longer)
2. Identifying the pins
Here is where that comes in handy pinout. Take your VGA connector and position it with the wider end of the connector at the top. The pins are numbered 1 through 15, with pin # 1 being the leftmost pin in the top row. In order to disable DDC without affecting anything else, you need to remove pin (see picture).
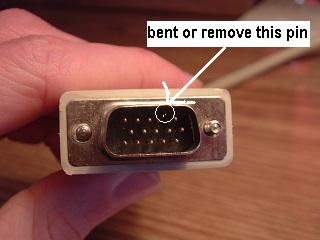
3. Bending or removing the pin
Firmly grip the pin with needle-nose pliers. Rock the pin back and forth, being careful not to bend any others (or the connector's outer shell), pulling it the whole time. It will take a few tries, but eventually you will get it out. I managed to remove exactly half of pin # 12 on my first try, and it took a bit more effort to remove the second half (seems like the top half of the pin is hollow or fluted in some connectors). if you want to bent pins that you must be sure it is not connect with another pin.
and I m sure your windows can display the dialog refresh rate and pick 60 Hz, and then reinstall your driver and windows, Wish it helps you out..
or if you want to force by input a refresh rate manually, it would be better use this software, called reforce and you can download here
My experience with the old CRT monitor when using Windows Vista or Windows 7, and Windows XP with the drivers and nVidia VGA cards, although you can only select the monitor mode and exposed by removing the check "Hide modes that this monitor can not display". but still not able to display correctly. What if your monitor supports higher resolution but still did not display the image, it means you are stuck in the limitations of 60 Hertz refresh rate, You will get blank display after windows starting even system running normally.
Why this happens?
Windows 9x uses the EDID to detect a Plug-and-Play monitor's maximum resolution, but this can be overridden by disabling PnP detection monitors and manually selecting a (modified) drivers for the monitor. Windows XP honors the EDID for PnP monitors as well, but this behavior can be overriden via the "Hide modes that this monitor can not display" option. Windows Vista honors the EDID no matter what, so the only way to disable it is to do so at the hardware level.
Solution
You must be doing a little hack to your DSub connector:
1. The Tools, make sure you have the following:
* Needle-nose pliers
* Pinout of a VGA connector, available here (optional)
* Monitor cable (VGA)
* A few minutes of time (but may take longer)
2. Identifying the pins
Here is where that comes in handy pinout. Take your VGA connector and position it with the wider end of the connector at the top. The pins are numbered 1 through 15, with pin # 1 being the leftmost pin in the top row. In order to disable DDC without affecting anything else, you need to remove pin (see picture).


3. Bending or removing the pin
Firmly grip the pin with needle-nose pliers. Rock the pin back and forth, being careful not to bend any others (or the connector's outer shell), pulling it the whole time. It will take a few tries, but eventually you will get it out. I managed to remove exactly half of pin # 12 on my first try, and it took a bit more effort to remove the second half (seems like the top half of the pin is hollow or fluted in some connectors). if you want to bent pins that you must be sure it is not connect with another pin.
and I m sure your windows can display the dialog refresh rate and pick 60 Hz, and then reinstall your driver and windows, Wish it helps you out..


